By Mats Svedman & Pierre Almqvist (© 2009)
(Note added: This article was written some years ago and be careful as both fuel/gasoline and oils changes in composition all the time, especially the fuel/gasoline that is added with more and more ethanol! Keep your eye on the changes which can cause problems with old car engines and fuelsystems.)
Part 2
Total Tune Up
Before describing how to optimize these settings, we must have an eye on some other things.
The cars are old, therefore we can not take anything for granted, much may have happened over the years.
1. How did the compression test we talked about before go? Did you have the compression you thought?
2. With the correct compression verified, our opinion is that for group 1 and 3 original GM spark plug and nothing else should be used. There are different opinions on this issue of course.
For Group 2 with the original compression, the same thing goes. For low compression 365, 390, 429 a step higher “heat range” on the spark plugs can be used.
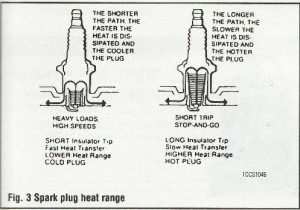
Picture with explanation how spark plugs heat range work
3. For 472 low comp., see part about ignition timing group 3 cars.
We really want to stress that for group 3 cars, it is very important to use originally specified AC spark plugs.
4. We assume that we have converted to electronic ignition system. Only hardcore originalists cope with the original breaker systems today.
5. Ignition Cables rotor and cap should be of good quality. In group 3 cars with HEI distributor the distributor and rotor should be of GM original type.
6. On group 2-3 cars cars with closed crankcase ventilation check that it is according to manual and that the PCV valve is changed according to specified intervals. Max 60000 km or 5 years between exchange.
7. Check that the camchain and gears are in perfect condition max. 150000 km, are you the slightest uncertain — change.
8. Exhaust system should be as close to original as possible. If you change to double system in a Cadillac built for single system you only loose power and fuel consumption up to about 3000 rpm, only above that you gain something and it´s only a small gain. 100 km/h is around 2000-2500 rpm. Sound costs power and fuel on low speeds.
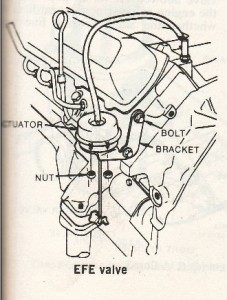
A very important detail is the so-called hotspots or EFE valve, which often is located on the left exhaust manifold and should be, even if it doesn´t work, is it in fully open position then it´s OK.
The function of the EFE in open position is during low and medium load to ensure that the intake manifold has the right temp. (Important that it is not stuck in closed position, then you get very hot exhaust gases through the intake manifold and can even damage the carburetor,
in addition to improper pressureloss in the exhaust system.)
9. The cooling system should be in perfect condition. An important detail is that the distance between the fan and the radiator on cars without fan shroud is not too large, should be 25-30 mm. When you replace the water pump, it is not certain that this is kept to correct distance.
This is adjusted by the length or position of the spacer located between the fan and pulley. On cars with so-called friction fan you should be sure that it works. In general, these had a best before date, at the slightest uncertainty: Get original fan without clutch, see the manual there
are always two options. Any fan shrouds should always be mounted.
In group 1 and 2 cars, it is best with a thermostat which is located between 82-87 degrees.
In group 3 cars keep the original thermostat temp.
10. Carburetor should preferably be original.
Check the number on the carburetor and compare with the manual.
We assume in this article that we have an original carburetor in good condition. No
modifications shall be made on the original carb setup to adapt to today’s fuel.
We will return in a later article to the detailed carburator theory and settings.
Optimization of ignition timing
Now we can finally begin.
We need a strobe light, tachometer, manual vacuum pump and a vacuum gauge.
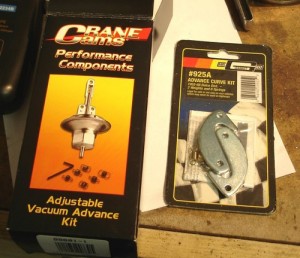
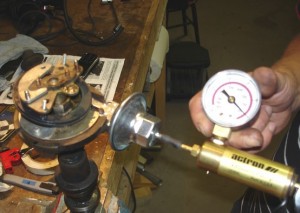
We recommend an adjustable vacuum regulator as seen in the picture above, in Sweden you can order it from Hansen Racing, also sold by Rogers Custom in Gothenburg. This kit includes springs for the centrifugal regulator. In addition, new weights for the centrifugal regulator can be procured from the same supplier if you need. See above image, these are a bit different so make sure you get the right ones. The best is to bring your old ones to the shop and compare.
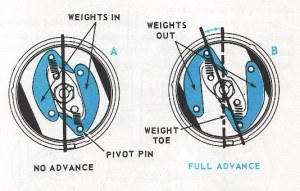
Picture showing the centrifugal weights in the distributor.
If the weights of the centrifugal regulator are in bad condition eg. The holes are worn (oval), buy a new set.
Once the centrifugal regulator is in good condition, the weights clean and tidy, the axle runs as it should we can calculate how many degrees of ignition timing advance we have.
Measure the distance from the center of the rotor to the outer edge of the rotor tip, we will now enter and test your old school math (some of you knew that someday it could be used for something useful).
The length of the rotor x 2 x π (3.14) = circumference in mm, divide this by 360, and because the rotor rotates with the half speed of the crankshaft, so we divide with 2, which gives degrees per mm.
We take an example:
Ex: A distributor has a rotor with a radius of 55mm x 2 = Diam. 110mm x π (3.14) = circumference 345mm, divided by 360 gives 0.96 mm = 1 degree on the distributor. Since 1 degree on the distributor = 2 degrees of the crankshaft, we must divide by 2 ie. 0.48 mm = 1
crankshaft degree. Should you have for instance 15 degrees ignition timing at the crankshaft, this is represented by 7,2 mm movement on the rotor tip. (See picture below).
Now we can measure how many degrees centrifugal advance your engine gets by holding the gear and rotate the rotor to full movement and drop it back. The springs shall without and sticky feeling snap back the rotor. Measure how many mm you got and use the calculation
that you previously worked out. How did it end, did you get enough advance?
Mount the vacuum regulator and measure the stroke by means of a vacumpump, use the same figures (in the above example 7,2 mm) as for the centrifugal regulator at full advance. This should be achieved at about 15 inch-Hg.
When this is checked and possibly corrected you can re-install the distributor.
Picture: Checking the vacuum regulator by means of a vacuumpump
TWO RULES FOR ALL GROUPS
1. Too much centrifugal advance makes the engine knock at fast acceleration. Vacuum under 9 inch / Hg. To little centrifugal advance makes the engine weak.
2. Too little vacuum regulator provides low power at low speed and the engine feels ”dull” in normal speeds (70-100 km/h).
That nice V8-power is not there anymore. The engine runs hot even if it´s not brought to boiling, the cooling system can barely keep up, and must work at full power.
One indication is an unnormal temperature rise at idle. Idle becomes difficult to get right.
Vacuum in the intake manifold is also difficult to get up to normal at idle.
Vacuum Levels
Group 1 and 2
Read the vacuum gauge. If everything is correct, the steady 18 inch-Hg or a bit over, then you are almost home and just fine-tuning remains.
Group 3
Read the vacuum gauge. If everything is right there should be a vacuum of more that 20.7 inch Hg.
Group 1.
In this group, it´s not uncommon to see that the Centrifugal and vacuum regulators have been replaced and that the values are very different from what´s in the manual. Many things may have been changed before you bought the car, so don´t be too worried.
These cars are today being fed with too high octane rating and this is why we shall adjust for this by starting with about 15 degrees centrifugal regulation at around 2200-2500, and for our type of driving, we should not regulate above about 2800 rpm.
Regarding the vacuum regulator is appropriate to begin with 15 to 20 degrees.
For best results, we start from the basic position of the ignition timing in the manual, you should not change more than a few degrees up or down.
A typical original value of the centrifugal regulator in this group is 10-12 degrees, in general this must be increased approximately 3-5 degrees. The Centrifugal regulator gives power at full throttle and power at high load.
As an example, if you have 12 degrees, and it is difficult to increase 3 degrees, you can sacrifice a little power by increasing the vacuum regulator more. The Vacuum regulator gives economy and that nice V8 flow that makes you feel that the car glides forward with almost no
gas at all around 100km/tim (55mph).
At 2500 rpm low load is it optimal with about 35-40 degrees of total ignition timing advance, an increase of about 5-10 degrees, this result can not be solely be reached with the basic ignition timing you normally perform — ”there are no shortcuts.”
Group 2 high compression
This group should be on Centrifugal advance according to original value plus some degree, but with a limitation that there is no further advance above 3000 rpm.
Here, we use the original basic ignition timing plus or minus one degree, but increase vacuumregulation by 2-5 degrees.
Group 2, which is converted to low compression; eg. 365, 390 and 429 see the setting for group 1, for 472, see the setting for group 3.
Group 1 and Group 2 is not possible to optimize for hard driving over 3000rpm, ”the racing freaks” can say what they want.
This group should stop centrifugalregulation over 3000 rpm because these engines do not cool the exhaust valves sufficiently for full regulation and shall only for a short time run over 3000 rpm for instance when overtaking and at kick-down during maximum few minutes.
If we should go beyond this it requires large and expensive modifications, such as loose valve seats, extra oil coolers and larger volume of oil with modified oil pump and larger radiator, etc..
Before we go in to Group 3 we should actually talk some about the environment, … yes, yes, it sounds boring but even you knows it is quite important in these times.
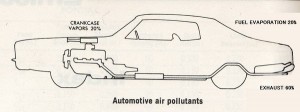
Above we show a very pedagogic picure where the dangerous pollutants was emmitted before the ”emission control program” started. Open crank case ventilation 20%, fuel tank 20% and exhaust 60 %.
The first requirement for so-called ”emission control” came in 1960 in California and was retroactive to 58 and 59 years’ models.
First up was closed crankcase ventilation, and these systems we should keep fully functioning.
The automotive industry in the United States offered no resistance when they understood that closed crankcase ventilation increases oil service life and reduced fuel consumption and increases engine power at low speed while removing 20% of car emissions of hydrocarbons
and smog-forming gases.
Then came the so-called ”Thermostatic Air Cleaner”. The basic principle of this system is to regulate intake air to about 40 C and only at full gas takes cold outside air.
Our friends’ “the racing freaks” likes the intake air to be as cool as possible, to get as much power as possible, but this does not apply to low load and normal driving. The system saves fuel during normal driving and reduces hydrocarbon emissions and 1966-67, and was first
introduced in California. The system should work for the car to feel good.
Then came the closed gas tank, 1968 in California. You should have this system in good order, so if you have not done it before so change the filter (Hansen Racing have it). Replace the activated carbon (purchase at winemaker shops the course type) check all hoses and fuel
filler cap and after that you can have reduced your hydrocarbon emissions by about 20 liters of a season. If the filter in the bottom of canis tern is clogged, you can also have problem to get good idle and difficult to start the car when it´s hot.
Now we come to the Roaring 70s with the lead-free gasoline, which initially wassimilar to kerosene. The automotive industry, which even then was taken over by the quarterly economists did not do anything as long as the cars were sold anyway.
Honestly talking, it was not until the Northstar engine was developed that Cadillac designed an engine for unleaded gasoline, with good performance and fuel economy!
Group 3 covers engines up to the Lambda period begins. Or the ”hose” era and the ”rubber band” period.
Group 3
Covering only 425, 472 and 500 engines
There is much power to harness here and also normally potentially a substantial reduction in fuel consumption. The group today runs on too good gas service and with the original values of ignition timing the engines produces — just a lot of hot water.
But first even more environment talk.
This group contains a myriad of variations of fullscale attempt of emission control systems which frankly speaking was no good except they three previously described.
Cars with EFE should be kept in good condition and when this work, suddenly also the automatic choke also works as it should.
Picture of a typical EFE valve
All forms and connections of vacuum regulators that should be rebuilt directly into the vacuum manifold, then plug and remove everything else.
EGR if it exists, remove and plug, preferably with a big plate on the intake manifold.
Pulse-AIR or AIR injection system should be removed and plugged and kept deep down in the garage where noone can find them.
Malfunctioning EGR and PulsAIR do more harm than good.
For those who might have a functioning catalytic converter that is not clogged and emptied of its contents, let it sit and watch so the pressure drop is not too high.
All the rest can be removed and put in the same box as the EGR-things (you remember…yes deep down in the garage).
These gadgets simply don´t work without the lambda probe, there was trials with different Centrifugal and Vacuum regulators to regulate NOx (Nitrogen Oxides) emissions, which was useless before the lambda probe. If they then also are in poor condition, they only increase
fuel consumption and emissions.
Group 3 adjustments.
Here we have a large variety of ignition timing on every model year, also different varieties of centrifugal regulators and vacuum regulators. Therefore, always begin with measuring up what you have.
As an example, we can take 425cui, 1978 with a centrifugal value from 9 degrees to 26 degrees depending on where the car is sold.
Although the distributor looks the same it doesn´t mean that it works the same.
Put a California distributor on a Canadian car and you get a real rubber band effect.
With 95 octane is the basic values at idle between 6-10 degrees WITHOUT vacuum regulator WITH vacuum regulator about 26-30 degrees. 20 degrees vacuum regulation is a good start in this group. A good start value in the centrifugal regulator is around 20-25 degrees at 2200 to
2500rpm, then a total ignition timing at between 40-48 degrees at 2500 rpm partial load.
These engines have very large combustion chambers andit takes time to burn the fuel mixture at a lower loads.
Remember that a 500 engine has combustion chambers that is 1,2 lit.
For further increase of power around 800-3000 rpm it is recommended to shave the cylinder heads about 0.5 to 0.7 mm, any more gives no more power.
For those who would like to hot up these giant engines it is possible, but not without other cylinder heads, intake manifold and cam, originally they are and will remain ”dead” over 3500 rpm.
Final Inspection
All groups
Connect vacuum gauges and have vacuum regulator connected, start the engine and drive carefully warm. Adjust by hand so that you get normal running.
If it has been difficult to bring down the idle for a long time before, you’ll now notice that it now certainly is easier.
Do a basic setup with the ignition timing lamp without the vacuum regulator connected.
Check Centrifugal with ignition timing light, at around 2200-2500, it shall provide approximately 20 degrees advance, do a brief rev-up and check that the centrifugal regulator does not increase the advance over 2800 rpm.
Return to idle again and connect the vacuum regulator, check the ignition with the timing light so that the ignition timing is around 20grader, adjust the idle.
Abstract
This article describes basic principles, degrees, etc. and should be seen as guidance rather than as absolute values. Remember that your car is a individual.
All adjustments and settings according to this article shall be at your own risk, but they can if used properly, provide a much better fuel economy and performance, and not least — pleasure.
In summary: There are no shortcuts to the wellbeing of an old Cadillac.
